Setting up email forwarders in cPanel is a powerful way to manage your email communications efficiently in your shared hosting and VPS hosting . Email forwarders automatically redirect incoming emails from one email address to another, which can be particularly useful for consolidating messages into a single inbox, ensuring messages reach multiple recipients, or managing emails sent to outdated addresses. This guide will walk you through the process of setting up email forwarders in cPanel, from logging in to managing your forwarders.
Table of Contents
What is an Email Forwarder?
An email forwarder is a tool that automatically redirects incoming emails from one address to another. For example, you can set up a forwarder to send emails from info@yourdomain.com to yourname@gmail.com. This can be useful for various reasons, such as consolidating communications, ensuring that messages are received even if an email address changes, or directing specific types of emails to relevant team members.
Step-by-Step Guide to Setting Up Email Forwarders in cPanel
1. Log in to Your cPanel Account
- Access cPanel:
- Open your web browser and navigate to the cPanel login page. This is often accessible via a URL like
http://yourdomain.com/cpanelor through your hosting provider’s control panel.
- Open your web browser and navigate to the cPanel login page. This is often accessible via a URL like
- Enter Your Credentials:
- Log in using your cPanel username and password. Once logged in, you will be directed to the cPanel dashboard.
2. Navigate to the Forwarders Section
- Locate the Email Section:
- In the cPanel dashboard, look for the “Email” section. This section houses various tools related to email management.
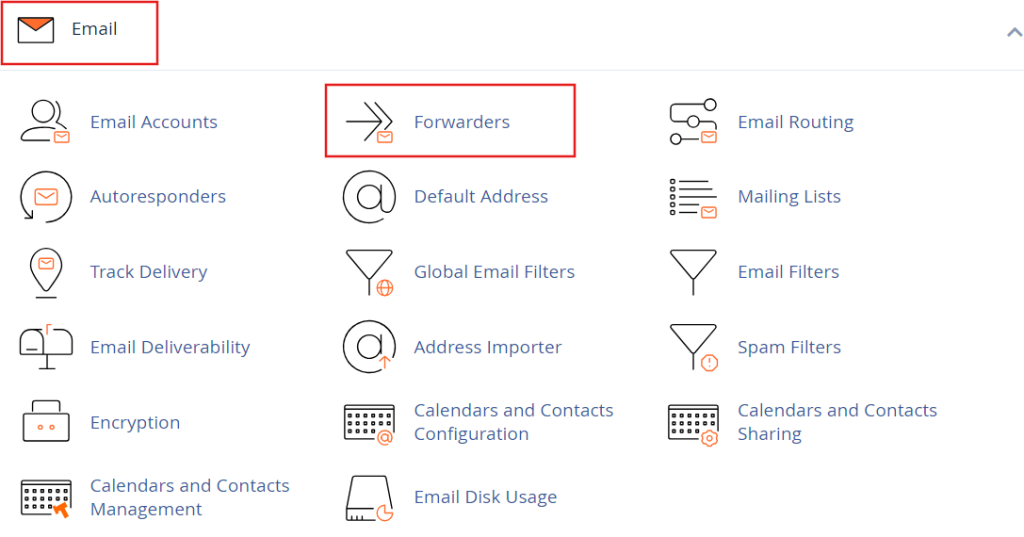
- Click on “Forwarders”:
- Find and click on the “Forwarders” icon. This will take you to the email forwarders management page.
3. Add a New Email Forwarder
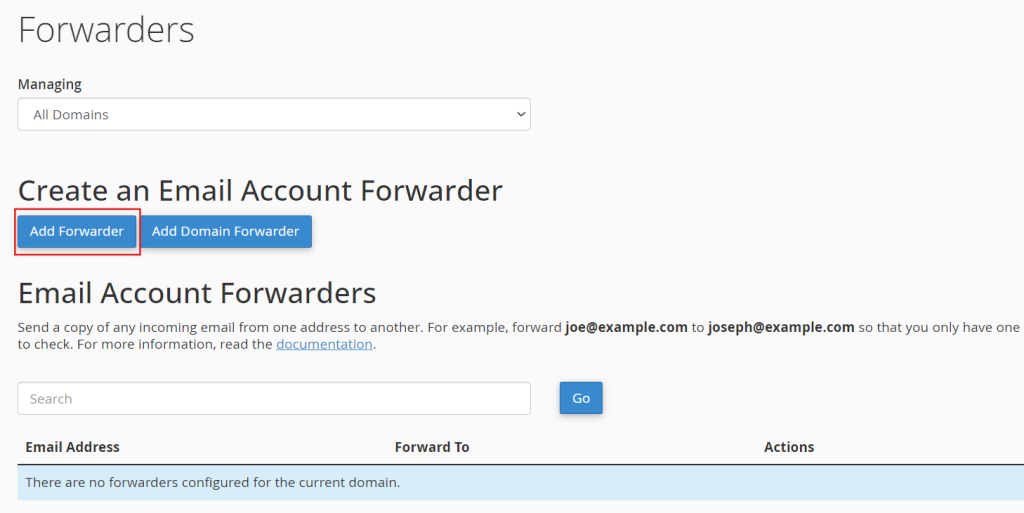
- Click on “Add Forwarder”:
- On the forwarders management page, you will see an option to “Add Forwarder.” Click this button to start creating a new forwarder.
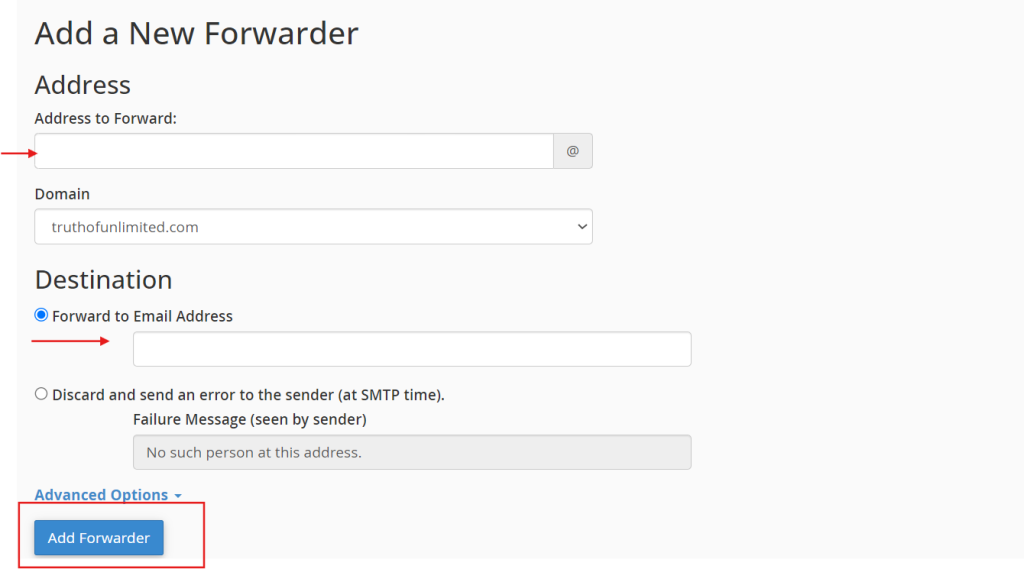
- Enter Forwarder Details:
- Address to Forward: In the “Address to Forward” field, enter the email address you want to forward. For instance, if you want to forward emails sent to
support@yourdomain.com, enter this address in the field. - Domain: Select the domain associated with the email address you are forwarding from the dropdown menu, if applicable.
- Destination: In the “Destination” field, enter the email address where you want the emails to be forwarded. This can be an email address within your domain or an external address like
yourname@gmail.com.
- Address to Forward: In the “Address to Forward” field, enter the email address you want to forward. For instance, if you want to forward emails sent to
- Optional Settings:
- Discard with Error to Sender (Fail): This option is not recommended for most users but can be used to reject emails that fail to forward properly. It’s generally better to handle errors separately.
4. Configure Additional Forwarders (If Needed)
- Add More Forwarders:
- If you need to set up multiple forwarders, you can repeat the process by clicking “Add Forwarder” again and entering the details for each additional forwarder.
- Manage Existing Forwarders:
- After adding forwarders, you can view and manage them from the same page. You will see a list of all configured forwarders, with options to delete or edit them.
5. Verify Forwarder Functionality
- Send a Test Email:
- To ensure that your forwarder is working correctly, send a test email to the address you’ve set up for forwarding. Check the destination email address to confirm that the email has been redirected as expected.
- Check Forwarding Rules:
- Review your forwarder settings if the test email does not arrive. Ensure that the email addresses are correctly entered and that there are no typos.
6. Managing and Troubleshooting Forwarders
- Edit Forwarders:
- To modify an existing forwarder, go to the forwarders management page, find the forwarder you want to change, and click “Edit.” Update the details as needed and save the changes.
- Delete Forwarders:
- If you need to remove a forwarder, go to the forwarders management page, locate the forwarder you want to delete, and click “Delete.” Confirm the deletion to remove the forwarder from your list.
- Troubleshoot Issues:
- If you encounter problems with forwarding, ensure that the email addresses are correct and that there are no conflicts with existing email settings. Verify that the destination email address is functioning correctly and not filtering or blocking forwarded emails.
Best Practices for Using Email Forwarders
- Keep Forwarding Rules Simple:
- Avoid setting up too many forwarders that could complicate email management. Use forwarders judiciously to maintain an organized email system.
- Regularly Review Forwarders:
- Periodically review your forwarders to ensure they are still relevant and functioning correctly. Remove any forwarders that are no longer needed.
- Monitor Forwarded Emails:
- Regularly check the destination inbox to ensure that forwarded emails are being received as expected and that no important messages are being missed.
By following these steps, you can effectively set up and manage email forwarders in cPanel and cPanel based hosting, streamlining your email communications and improving your overall email management strategy.