Installing and configuring a control panel on your Virtual Private Server (VPS) can significantly simplify server management. Control panels provide a user-friendly interface to manage server resources, websites, databases, email accounts, and more, without needing extensive command-line knowledge. This guide will walk you through the process of installing and configuring a control panel on your VPS.
Table of Contents
1. Choose a Control Panel
The first step is to select a control panel that suits your needs. Some popular options include:
- cPanel/WHM: A widely-used commercial control panel with robust features and extensive support. It’s ideal for web hosting environments.
- Plesk: Another commercial option with a user-friendly interface and strong support for both Linux and Windows servers.
- Webmin/Virtualmin: A free, open-source control panel that offers flexibility and is suitable for managing both web and server tasks.
- ISPConfig: A free, open-source control panel known for its multi-server management capabilities.
- Ajenti: A modern, open-source control panel that provides a clean interface and a range of management features.
2. Prepare Your VPS
Before installing a control panel, ensure your VPS is ready:
- Update Your System: Start by updating your server’s operating system to the latest version. This ensures you have the latest security patches and software updates. For example, on Ubuntu, use:

- Set Up a Static IP Address: A static IP is often required for control panels. Ensure your VPS has a static IP assigned and properly configured.
- Create a Root User or Admin Account: Ensure you have root or sudo privileges on your VPS to install and configure the control panel.
3. Install the Control Panel
cPanel/WHM
- Download the Installation Script:

2. Run the Installation Script:

- The installation process can take some time. Follow the on-screen prompts and ensure your server meets the system requirements specified by cPanel.
- Complete the Configuration: Once installed, access WHM by navigating to
https://your-server-ip:2087in your web browser. Follow the initial setup wizard to configure your server.
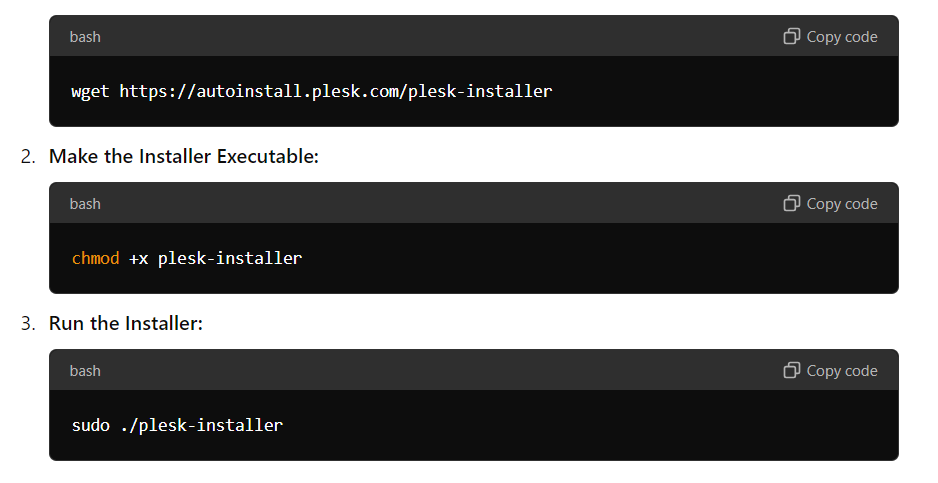
Plesk
- Download the Installer:
4. Configure the Control Panel
After installation, you need to configure your control panel to suit your requirements.
- Initial Setup:
- cPanel/WHM: Follow the WHM setup wizard to configure your server’s hostname, nameservers, and other settings.
- Plesk: Complete the initial setup by providing details such as your license key and configuring basic settings.
- Webmin/Virtualmin: Run the setup wizard available in Webmin/Virtualmin to configure server settings, including domain management, mail server setup, and security options.
- Create User Accounts: Set up user accounts and permissions according to your needs. This typically includes adding FTP users, email accounts, and database users.
- Configure Security:
- Firewall: Ensure that your VPS firewall is configured to allow access to the control panel ports (e.g., 2087 for cPanel, 8443 for Plesk).
- SSL Certificates: Configure SSL certificates to secure access to your control panel. Most control panels offer built-in tools for managing SSL certificates.
- Backup and Monitoring: Configure backup options to ensure that your server data is regularly backed up. Set up monitoring tools to keep track of server performance and resource usage.
5. Post-Installation Tasks
- Test Your Setup: Verify that all services are running correctly by accessing the control panel and performing basic tasks.
- Documentation: Familiarize yourself with the documentation and support resources available for your chosen control panel to make the most of its features.
Conclusion
Installing and configuring a control panel on your VPS can greatly enhance server management efficiency. By following this guide, you can select the right control panel, prepare your VPS, perform the installation, and configure it to meet your needs. Proper setup and management ensure that your server operates smoothly and effectively supports your applications and websites.