
An addon domain is a fully functional domain that can be created from within your control panel. This addon domain is a new, unique website hosted in a new folder on your account so that you can host several domains from one control panel. You can give an addon domain email address, forwarders, and more in the same way as a primary (main) domain on the account. Adding an add-on domain in cPanel is a straightforward process that allows you to host multiple independent websites within the same cPanel account. Each add-on domain has its own separate content, and visitors can access it as if it were a standalone domain. Here’s a step-by-step guide on how to create an add-on domain in cPanel:
Table of Contents
Step 1: Access cPanel
- Login to cPanel:
- Open your web browser and type the following address:
http://yourdomain.com/cpanel(replace “yourdomain.com” with your actual domain). - Enter your cPanel username and password to log in.
- Open your web browser and type the following address:
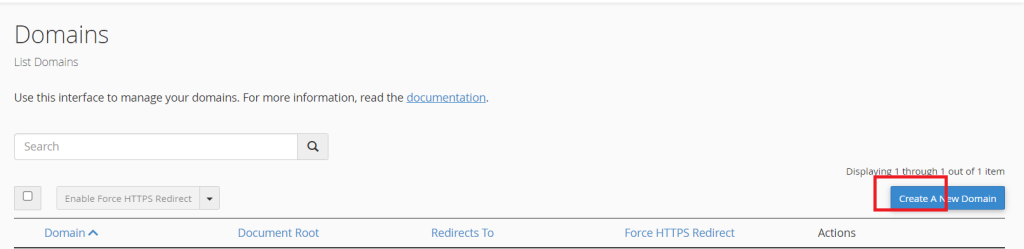
Step 2: Navigate to “Domains” Section
-
- Once logged in, scroll down to the “Domains” section in cPanel.
- Click on the “Domains” icon or link.

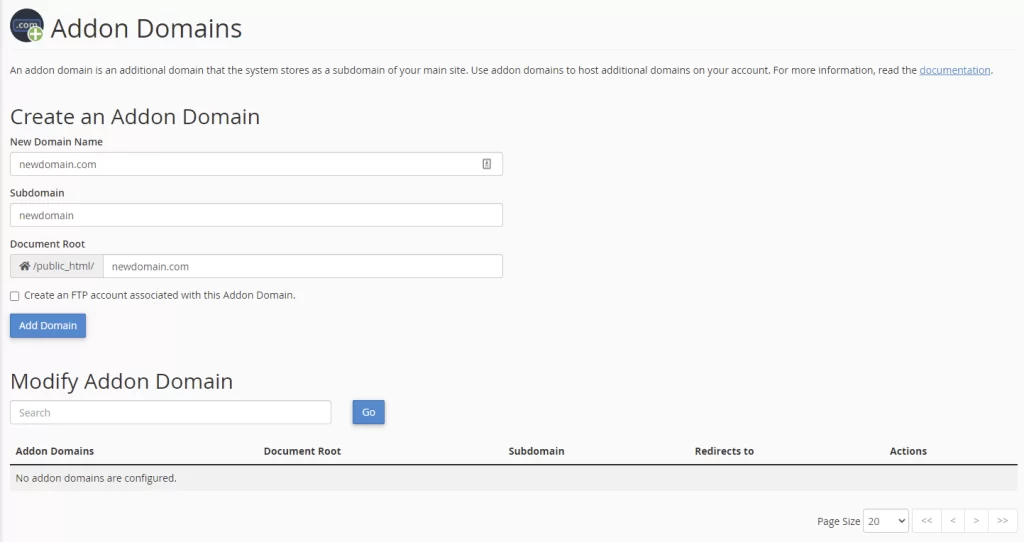
Step 3: Fill in Addon Domain Details
- Enter Domain Details:
- In the “Create an Addon Domain” section, you’ll find the following fields:
- New Domain Name: Enter the new domain name you want to add, without the “www” prefix.
- Subdomain: cPanel will automatically populate this field based on the domain name you entered.
- Document Root: This is the directory where the add-on domain’s files will be stored. cPanel will suggest a default, but you can modify it if needed.
- In the “Create an Addon Domain” section, you’ll find the following fields:
Step 4: Set Up FTP Account (Optional)
- Create an FTP Account (Optional):
- If you want to create a separate FTP account for the add-on domain, check the “Create an FTP account associated with this Addon Domain” box.
- Enter the FTP username, password, and directory.
Step 5: Add Domain
- Click “Add Domain”:
- After filling in the required details, click the “Add Domain” button.
Step 6: Verify the Add-On Domain
- Verify Domain Addition:
- cPanel will display a confirmation message once the add-on domain is successfully created.
- You can now see the new add-on domain listed in the “Addon Domains” section.
Step 7: Update DNS (If Domain is Registered Elsewhere)
- Update DNS Records (If Required):
- If the domain is registered with a different registrar, you’ll need to update its DNS settings to point to your hosting provider’s nameservers.
- Access your domain registrar’s control panel and update the nameservers to those provided by your hosting provider.
Additional Tips:
Subdomain Creation (Optional):
- While creating an add-on domain, cPanel automatically suggests a subdomain. This subdomain can be used to access the content of your add-on domain, but it’s optional.
FTP Account Management:
- If you opted to create a separate FTP account for the add-on domain, you can manage it in the “FTP Accounts” section within cPanel.
SSL Certificate (If Required):
- If your add-on domain requires an SSL certificate, you may need to install one. Some hosting providers offer free SSL certificates through services like Let’s Encrypt.
File Management:
- Use the File Manager in cPanel to upload files specific to the add-on domain. Navigate to “File Manager” in cPanel, and select the directory associated with the add-on domain.
Conclusion:
Adding an add-on domain in cPanel allows you to efficiently manage multiple websites under a single hosting account. Ensure that the DNS settings are configured correctly, and if the domain is registered elsewhere, update the nameservers accordingly. Additionally, consider configuring any necessary SSL certificates and managing FTP accounts if required. Following these steps will help you seamlessly create and manage add-on domains within your cPanel hosting environment.